cdkbook
Depiction
The CDK originates from the merger of Jmol and JChemPaint [1]. As such, CDK has long contained code to depict molecules. However, after the 1.0 series, a rewrite of the code base was initiated, causing the CDK 1.2 series to not be available with rendering functionality. During the development of the 1.4 series, the rendering code became gradually available as a set of patches, and, separately, as a JChemPaint applet. The new rendering code has entered the CDK.
However, if you need rendering of reaction schemes or the editing functionality found in JChemPaint, you still need the CDK-JChemPaint patch.
Molecules
Rendering molecules to an image was previously done in a few steps. It involved
a BasicSceneGenerator, a BasicAtomGenerator, and a
BasicBondGenerator.
Nowadays, we can use the convenience class DepictionGenerator.
The code example looks like this:
Script code/RenderMolecule.groovy
new DepictionGenerator()
  .withSize(600, 600)
  .withMargin(0.1)
  .withZoom(3.0)
  .withAtomColors()
  .depict(triazole)
  .writeTo("RenderMolecule.png");
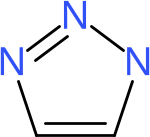
This results in the image of triazole given in Figure 16.1.

Figure 16.1: 2D diagram of triazole
Scalable Vector Graphics
The image can also be generated as Scalable Vector Graphics (SVG):
Script code/RenderMoleculeSVG.groovy
new DepictionGenerator()
  .withSize(600, 600)
  .withAtomColors()
  .depict(triazole)
  .writeTo("RenderMolecule.svg");
Background color
Starting from the above pattern, you can also customize the background color.
This code uses the withParam() method to customize the rendering:
Script code/BackgroundColor.groovy
new DepictionGenerator()
  .withSize(600, 600)
  .withMargin(0.1)
  .withZoom(3.0)
  .withAtomColors()
  .withParam(BasicSceneGenerator.BackgroundColor.class, Color.lightGray)
  .depict(triazole)
  .writeTo("BackgroundColor.png");
The result of this code is depicted in Figure 16.2.

Figure 16.2: Triazole depicted with a custom, grey background.
Coloring selections
We can highlight atoms and bonds by giving them an annotation color. By default, it will color the atoms with that color, but we may prefer to give them an outer glow. That means we need to annotate the atoms, but also modify the generator parameter to select outer glow. The width of the glow can also be tuned:
Script code/RenderSelection.groovy
triazole.getAtom(0).setProperty(
  StandardGenerator.HIGHLIGHT_COLOR, new Color(0x98F08E)
)
new DepictionGenerator()
  .withSize(600, 600)
  .withMargin(0.1)
  .withZoom(3.0)
  .withAtomColors()
  .withParam(StandardGenerator.Highlighting.class,
             StandardGenerator.HighlightStyle.OuterGlow)
  .withParam(StandardGenerator.OuterGlowWidth.class, 3d)
  .depict(triazole)
  .writeTo("RenderSelection.png");
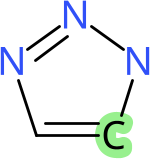
This results in the image of triazole with an atom highlighted with a green background, as given in Figure 16.3.

Figure 16.3: 2D diagram of triazole
Parameters
Rendering wasn’t as much fun, if you could not tune it to your needs. JChemPaint
has long had many rendering parameters, which are now all converting to the new
API. The following code is an modification of the code example in
snippet RenderMolecule, and adds some
code to list all rendering parameters for the three used generators:
Script code/RendererParameters.groovy
// generators make the image elements
List<IGenerator> generators =
  new ArrayList<IGenerator>();
font = new Font(Font.SANS_SERIF, Font.PLAIN, 13)
generators.add(new BasicSceneGenerator());
generators.add(new StandardGenerator(font));
// dump all parameters
for (generator in renderer.generators) {
  for (parameter in generator.parameters) {
    println "parameter: " +
      parameter.class.name.substring(40) +
      " -> " +
      parameter.value;
  }
}
The output will look something like:
parameter: BasicSceneGenerator$BackgroundColor -> java.awt.Color[r=255,g=255,b...
  =255]
parameter: BasicSceneGenerator$ForegroundColor -> java.awt.Color[r=0,g=0,b=0]
parameter: BasicSceneGenerator$Margin -> 10.0
parameter: BasicSceneGenerator$UseAntiAliasing -> true
parameter: BasicSceneGenerator$UsedFontStyle -> NORMAL
parameter: BasicSceneGenerator$FontName -> Arial
parameter: BasicSceneGenerator$ZoomFactor -> 1.0
parameter: BasicSceneGenerator$Scale -> 1.0
parameter: BasicSceneGenerator$BondLength -> 40.0
parameter: BasicSceneGenerator$FitToScreen -> false
parameter: BasicSceneGenerator$ShowMoleculeTitle -> false
parameter: BasicSceneGenerator$ShowTooltip -> false
parameter: BasicSceneGenerator$ArrowHeadWidth -> 10.0
parameter: BasicSceneGenerator$ShowReactionTitle -> false
parameter: standard.StandardGenerator$AtomColor -> org.openscience.cdk.rendere...
  r.color.UniColor@55b62db8
parameter: standard.StandardGenerator$Visibility -> org.openscience.cdk.render...
  er.generators.standard.SelectionVisibility@e5c5e6
parameter: standard.StandardGenerator$StrokeRatio -> 1.0
parameter: standard.StandardGenerator$BondSeparation -> 0.16
parameter: standard.StandardGenerator$WedgeRatio -> 6.0
parameter: standard.StandardGenerator$SymbolMarginRatio -> 2.0
parameter: standard.StandardGenerator$HashSpacing -> 5.0
parameter: standard.StandardGenerator$DashSection -> 8
parameter: standard.StandardGenerator$WaveSpacing -> 5.0
parameter: standard.StandardGenerator$FancyBoldWedges -> true
parameter: standard.StandardGenerator$FancyHashedWedges -> true
parameter: standard.StandardGenerator$Highlighting -> Colored
parameter: standard.StandardGenerator$OuterGlowWidth -> 2.0
parameter: standard.StandardGenerator$AnnotationColor -> java.awt.Color[r=255,...
  g=0,b=0]
parameter: standard.StandardGenerator$AnnotationDistance -> 0.25
parameter: standard.StandardGenerator$AnnotationFontScale -> 0.5
parameter: standard.StandardGenerator$SgroupBracketDepth -> 0.18
parameter: standard.StandardGenerator$SgroupFontScale -> 0.6
parameter: standard.StandardGenerator$OmitMajorIsotopes -> false
parameter: standard.StandardGenerator$ForceDelocalisedBondDisplay -> false
parameter: standard.StandardGenerator$DelocalisedDonutsBondDisplay -> true
parameter: standard.StandardGenerator$DeuteriumSymbol -> true
parameter: standard.StandardGenerator$PseudoFontStyle -> 3
Reactions
Reactions can be rendered too. This functionality was originally developed to aid the curation of
the MACiE database [2]. Section ?? outlined the
reaction data model, so we start from a populated IReaction
here. The original approach used a special rendered, ReactionRenderer, additional generator classes,
ReactionScenceGenerator, ReactionArrowGenerator, and with more than one reactant or
product the ReactionPlusGenerator, and a extended draw visitor, called ExtraAWTDrawVisitor.
However, now we can use the same DepictionGenerator as before:
Script code/RenderReaction.groovy
sp = new SmilesParser(
  SilentChemObjectBuilder.getInstance()
)
reaction = sp.parseReactionSmiles("CC=C.O>[H+]>CCCO")
new DepictionGenerator()
  .withSize(1200, 300)
  .withFillToFit()
  .withAtomColors()
  .depict(reaction)
  .writeTo("RenderReaction.png");
The result shown in Figure 16.4, but some tweaking may be needed.

Figure 16.4: Depiction of hydrolization of an alkene
References
- Krause S, Willighagen E, Steinbeck C. JChemPaint - Using the Collaborative Forces of the Internet to Develop a Free Editor for 2D Chemical Structures. Molecules. 2000 Jan 28;5(1):93–8. doi:10.3390/50100093 (Scholia)
- Holliday GL, Andreini C, Fischer JD, Rahman SA, Almonacid DE, Williams ST, et al. MACiE: exploring the diversity of biochemical reactions. NAR. 2011 Nov 3;40(Database issue):D783-9. doi:10.1093/NAR/GKR799 (Scholia)